Why Is My Deck Board Warping? (And How to Fix It)
Published by TradeIQ · Updated
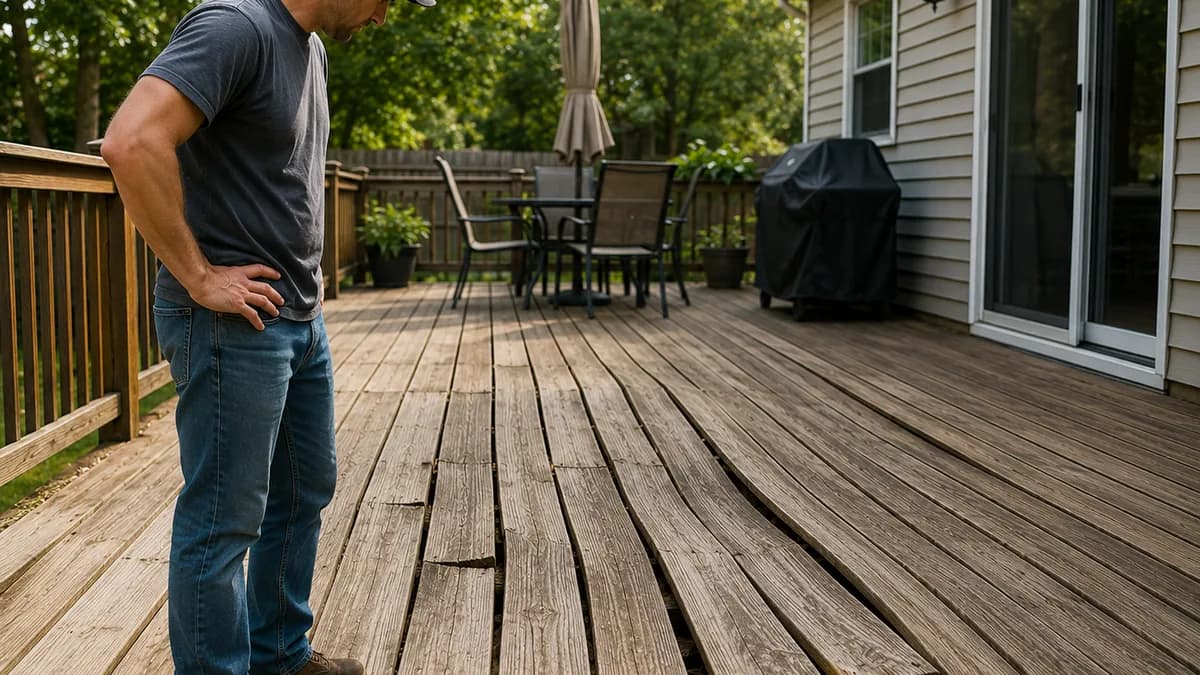
A deck board that has gone crooked is the wood telling you something changed under it. Maybe the underside stayed damp while the top face baked in the sun. Maybe the board went down too green and dried out in place. Maybe the gaps were pinched too tight for it to move at all. So when you're crouched on your deck wondering why is my deck board warping, the honest answer is that you're really asking which of those things happened, because the exact shape the board took points almost straight at the cause. This page walks you through reading that shape, matching it to a fix you can do with a drill on a Saturday, and spotting the one or two cases where the board or the frame under it has moved past a weekend repair.
Key takeaways
- Trade the word "warping" for the exact shape first. Cupping, bowing, crooking, twisting, checking, and splitting each point at a different cause, so naming yours correctly is most of the diagnosis.
- Cupping across the width is almost always a wet underside drying slower than a sun-baked top. Look under the deck for standing water, soaked soil, or sealed-off skirting before you touch a board.
- Most single boards are a do-it-yourself fix: screw a cupped board back down with added blocking, flip it cupped-face-down, plane a raised lip, or swap one bad board for a matching new one.
- Composite and PVC move with temperature, not moisture, and they do not share one spec. Trex, TimberTech, and AZEK each publish different side, end, and wall gaps, and some of those change with the temperature on install day.
- AZEK PVC is the exception that breaks the usual advice: its guide says keep butt joints TIGHT, with no gap at joints, splices, or miters. Gapping them because a website said to is how you get it wrong.
- The 19 percent moisture figure is a lumber grading line (S-DRY versus S-GRN at the mill), not an installation instruction. Acclimate the boards and don't fasten them soaking wet, but don't chase a meter number.
- The tidy rule that sealing only the top prevents cupping is a myth. Sealing every face and both ends is what evens out the water swing, and even that reduces the problem rather than ending it.
Six ways a board goes wrong, and what each one looks like
Warping is a catch-all word, and the first move is to trade it for a more exact one. A board can deform in a handful of distinct ways, and naming yours correctly is half the diagnosis. Crouch at the end of the board and sight down it, then look at it across the width. You're sorting it into one of these:
- Cupping: the two long edges curl up or down across the width, so the board reads as a shallow trough or a shallow dome when you look at the cut end. Water pools in the low middle, and shoe soles catch the raised edges.
- Bowing: the whole board curves along its length, so the middle humps up or sags down between its fastened ends. It rocks or bounces underfoot even though both ends are screwed tight.
- Crooking: the board stays flat across its face but its edge curves sideways, so a run of boards starts to snake left and right instead of holding a straight line against a string.
- Twisting: one corner lifts and rotates while the diagonal corner stays put, so the board looks wrung out like a wet towel. This is the one that pops fasteners and trips people.
- Checking: fine, shallow cracks running with the grain on the surface. They start cosmetic and are mostly a water-entry warning rather than a strength problem on day one.
- Splitting: deeper cracks that go through the thickness, usually opening at the board ends or right along a line of screws, until the two sides of the split move on their own.
One board will often show two of these at once, like a cupped board that has also started checking along the high edges. When that happens, the worst of the two usually decides the repair.
Read the shape to find the cause
Once you've named the shape, you can work backward to what did it. Here is how each pattern tends to trace to its cause, and the quick check that confirms it.
Cupping across the width
Cupping is the classic wet-underside story. The bottom face of the board holds moisture from damp ground or trapped air while the top face dries fast in the sun, the top shrinks quicker than the bottom, and the edges pull upward. Get down and look under the deck. Standing water, soaked soil a few inches below the boards, or skirting that seals the whole underside off from any breeze all point here. Boards that were sealed only on the visible top face, with bare wood underneath, cup faster because only one side is drinking. If the cupping gets worse right after a heavy rain followed by a hot spell, that is your confirmation.
Bowing down the length
A single board that humps or sags between two solid ends is usually fighting its own internal grain stress, and it had help. Sight down the length and compare it to its neighbors to be sure it is the outlier. If the joists under it are spaced wider than the board is rated to span, the board has too much unsupported length and waves between supports. That joist-spacing side of things belongs to the framing, so if the whole deck bounces, take a look at the joist span tables rather than chasing one board.
Crooking off to the side
When a board is flat across its face but its edge wanders sideways, you are usually looking at a natural crook that was there in the lumber pile and never got pulled straight at install. Uneven fastening lets it drift further. Sight along the edge against a chalk line or a string and see whether one board is bowing the line while the rest hold true. If it is just the one piece, the fix is local.
Twisting at a corner
A lifted, rotated corner comes from strong internal stress in that particular piece of wood combined with too little to hold it down. Look at the twist and count the screws around it. A wide gap between fasteners, a single nail where two screws belong, or soft, rotted, undersized framing beneath all let a stressed board wind up off the deck. Twisting is the trip hazard of the group, so it moves up the priority list.
Checking and splitting at the ends
Cracks that open at the very ends of a board or right along a screw line usually come from two things. Fasteners driven too close to the end of a dense board, especially a hardwood like ipe, without a pilot hole, and end grain that was left bare to soak up and shed water over and over. Note where the crack starts. If it radiates from a screw or from the last inch of the board, the fastener placement or the unsealed end is your answer.
The old rules of thumb, and which ones to trust
Ask around a lumberyard and you'll collect a few sayings about warping. Some hold up and some are worth a grain of salt, so it's worth being straight about which is which.
You'll hear that moisture imbalance is the number one thing behind cupping and warp. That lines up with how wood actually behaves, and it is the first thing to check, but treat it as widely repeated builder wisdom rather than a settled, lab-ranked fact, because nobody points to a study that crowns it the single cause. You'll also hear the rule to lay boards "bark side up," reading the curve of the growth rings on the end to decide which way to face them. That is a traditional heuristic passed down the trades, not a proven cure, so use it as a tiebreaker at install and don't expect it to save a board that is soaking wet on one side.
Then there is the tidy promise that sealing the top of your boards stops cupping, and that one you should drop outright. Sealing only the face people can see keeps the imbalance going, since the underside still trades water freely. Finishing every side, ends included, is what actually cuts down the swing, and even then it reduces the problem rather than banishing it.
The 19 percent number, and why it is not an instruction
Plenty of guides tell you to fasten deck boards once the wood's moisture content reads 19 percent or below. We printed that ourselves. The number is real, but it has been quietly promoted out of its lane, and here is what it actually is.
Nineteen percent is a lumber grading line. Under the grading rules, lumber at 19 percent or less is classified as dry and gets stamped S-DRY or KD, and anything above 19 percent is classified as unseasoned and gets stamped S-GRN. That is a decision made at the mill, at the moment the board is graded and surfaced. No grading agency and no decking manufacturer publishes a rule telling you to install at or below 19 percent, and much pressure-treated lumber is sold soaking wet, well above that line. An outdoor deck board is also going to drift toward whatever moisture your climate holds, no matter what your meter said on install day.
So do not chase a meter number. Do the thing the number was pointing at: sticker the boards on site for a few days so they settle toward the conditions they will actually live in, and don't fasten lumber that is dripping off the truck.
Fixing it yourself, one board at a time
If the trouble is one board or a small handful and the frame underneath is sound, this is do-it-yourself territory. Work in rough order of least effort to most, and keep your proper gaps as you go so you don't just recreate the problem.
- 1Pull it back down with fasteners. For a board that has cupped or bowed but is still solid, back out the failed nails, drive proper deck screws down into the joists, and where you can reach underneath, add a short block of blocking to give the middle something to bite into. Work along the length, drawing the board down a bit at a time. This is the low-effort fix, and for a few boards it is usually a handful of dollars in screws.
- 2Flip the board over. Cosmetic cupping on a board whose underside is still clean is a good candidate for a flip. Take the fasteners out, turn it so the cupped face points down, and reset it with correct spacing and a coat of sealer on the fresh-up side. It is mostly labor, more of it if the board sits inside a picture-frame border or against a railing.
- 3Plane or sand the high spots. A slight cup or a raised lip can be knocked down with a hand plane or a sander until the surface is flat and safe to walk. Go easy so you keep enough thickness in the board. This suits the case where fully flattening the piece is a lost cause but taking the edge off makes it functional again.
- 4Replace the single board. Severe twisting, a split that has opened through the thickness, hardwood cracked at the ends, or a composite piece that simply won't straighten all say the board is done. Pull it, cut it out if you have to, and set a new one that matches the thickness, and the species or the composite brand and color, with the right gaps and sealing. One board is cheap next to redoing the whole surface, which is the entire reason to do this board by board.
When it has moved past a weekend fix
There is a point where board-by-board repair is just bailing a leaky boat. Wide-area cupping across many boards with damp, unventilated ground that never dries out, wrong spacing or the wrong fasteners run across a whole composite deck, or a substructure that flexes because joists or beams are rotting or undersized, all mean the cause is systemic and the surface will keep failing until the root is fixed. That is the moment to price a partial or full re-deck against more patching, and to get eyes on the framing before you spend on new boards.
One warped board, or the whole frame under it?
Snap a few photos, one down the length of the warped board and one of the joists and ground underneath, and send them through TradeIQ. A vetted deck builder who has no repair to sell you will size up whether you're looking at a board you can flip this weekend or a moisture-and-framing problem that a fresh surface would only hide. What you get back is a builder's read on the deck itself, not a bid dressed up as advice.
Composite and PVC boards move too, and not for the same reason
People buy composite and PVC expecting it to sit still forever, so when it moves it catches them off guard. It does move, just on different physics than wood. These boards expand and contract with temperature rather than moisture, and mostly along their length, since a board is roughly thirty times longer than it is wide.
The makers publish the coefficients, and they are not the same. Trex lists thermal expansion for its composite at 1.9 hundred-thousandths of an inch, per inch of board, per degree Fahrenheit. TimberTech's AZEK, which is PVC rather than wood-plastic composite, lists 2.32, so PVC moves about a fifth more per degree. Work that through and a 16 foot board travels about three-sixteenths of an inch across a 50 degree swing, and closer to half an inch across the full range from minus 20 to 125 degrees that both makers rate their boards for. That last figure is the one that matters, because a black composite board in August is far hotter than the air around it.
When that movement has nowhere to go, it shows up as what looks like warping: a board buckling upward into a kink on a hot afternoon. The usual trigger is a gap left too tight at a butt joint, a miter, a wall, or a picture-frame border. Joists spaced wider than the brand allows let the board sag and wave between supports. And reflected heat off glass doors, light siding, or metal can soften a PVC board and push its movement further.
The gap numbers, and a correction we owe you
We previously told you TimberTech specifies one-eighth to seven-thirty-seconds of an inch side to side. That is wrong, and it is wrong in the dangerous direction. TimberTech's composite lines require a minimum of one-eighth and a MAXIMUM of three-sixteenths, and three-sixteenths is six-thirty-seconds. Our number was wider than the maximum the manufacturer allows, and building to it would have put you outside spec on every board edge and given them grounds to deny a warranty claim. We are sorry. Go by the guide for the exact board you own, and see the numbers below.
Here is what the three big names actually publish, and notice they do not agree, which is the real lesson. Trex requires a minimum three-sixteenths inch side to side, and that one figure does hold in both hot and cold installs. But Trex's END gaps are temperature dependent: one-eighth of an inch above 40 degrees and three-sixteenths below it, widening to a quarter or a half inch where a board runs into a wall. TimberTech's composite wants one-eighth to three-sixteenths on the sides, at least three-sixteenths where a board meets a structure or a post, and a butt gap that changes with the thermometer: three-sixteenths at freezing and below, one-eighth in the middle range, and a bare thirty-second of an inch above 75 degrees.
And then AZEK PVC breaks the rule the rest of this section is built on. AZEK wants one-eighth to a quarter inch on the sides, and at the butt joints it wants no gap at all. Its guide says to keep butt joints tight, and not to leave a gap at joints, splices, or miters. So the advice "gap your butt joints" is correct for composite and flatly wrong for AZEK PVC. If you own PVC, the fix for your buckling board is not more gap. Read your own guide.
Stop it from coming back when you re-deck
If you're pulling boards anyway, this is the cheap moment to build the warping out of the next surface. A handful of habits do most of the work:
- Give the boards room to move, and get the number from the right place. Wood decking is commonly laid with an eighth to a quarter inch between boards. For composite or PVC, do not use a rule of thumb at all: pull the installation guide for the exact board you bought, because the side gap, the end gap, and the wall gap are three different numbers and two of them may change with the temperature on the day you install.
- Let wood acclimate and go down dry. Sticker the boards on site for a few days so they settle to your yard, and skip the meter target. What matters is that the board is not soaking wet off the truck.
- Seal every face and both ends. Coat all four sides and the cut ends before the board goes down, not just the top. Then reapply on the finish maker's schedule, and expect that schedule to swing hard by product: Thompson's WaterSeal says every two to three years, while Behr sells its Premium waterproofing stains on claims of up to six years for semi-transparent and up to ten for solid. The reliable check is not the calendar, it is the splash test. Sprinkle water on the board. If it soaks in and darkens instead of beading up, it is time.
- Match the fastener to the material, and know what the clip is actually doing. Composite hidden fasteners are not a floating mount that lets the board slide. What they do is set the gap for you, which Trex says plainly: the placement of the hidden fastener establishes the designated gap size. Use the screw the maker lists. Fiberon warns that the wrong screw, or an overtightened one, causes cracking at the board ends. TimberTech warns that a non-composite screw mushrooms and splits the board. And Trex will not cover any condition caused by non-recommended fasteners under its warranty.
- Keep the underside dry. Leave a ventilation gap and ground clearance, skip solid skirting that traps moist air against the boards, and slope the grade or lay gravel so the space under a low deck actually drains instead of staying a wet sponge.
One warning if the stairs are part of your re-deck: the clips don't belong there. Grooved, hidden-fastened boards are barred from stair treads by TimberTech, Fiberon, and Trex alike, and the stringer spacing under a tread is its own published number. That belongs to the frame, and we cover it in our guide on how to frame a deck.
Do those five and most boards stay flat for the life of the deck. Miss them and you'll be back on your knees with a drill and this page in a few seasons. Read the shape, match it to the cause, fix the boards that are worth saving, and fix the ground and the gaps so the new ones don't follow.
Photograph the warp before you pry a board up
Send the deformed board down its length plus the framing and ground beneath it, and a vetted deck pro on TradeIQ will read the cause and the honest fix straight off the photos: a Saturday refasten, one board to swap, or a moisture-and-framing job that a new surface would only bury. We aren't the ones you'd hire to do the repair, so the read comes back straight.
A Written Review with a couple of clear photos is the fastest way to get it looked at.
Get an unbiased expert reviewFrequently asked questions
- Why are my deck boards cupping?
- Cupping, where the long edges curl across the width, is usually a moisture imbalance between the two faces of the board. The underside holds water from damp ground or trapped, unventilated air while the top dries fast in the sun, the top shrinks quicker, and the edges pull up. Boards sealed only on the visible top face cup sooner because the bare underside keeps drinking. Check under the deck for standing water, soaked soil, or skirting that seals off airflow, and note whether it worsens after rain followed by heat.
- How do you fix cupped deck boards?
- If the board is still sound, back out the old nails and draw it down flat with proper deck screws into the joists, adding a block of blocking underneath where you can reach for the middle to bite into. A board that has cupped only cosmetically, with a clean underside, can be unscrewed and flipped so the cupped face points down, then reset with correct gaps and fresh sealer. A slight raised lip can be planed or sanded flat instead. Keep your spacing gaps as you refasten so you don't recreate the same trap, and fix the wet ground underneath or the new position will cup too.
- Can warped deck boards be fixed?
- Often, yes, and the shape tells you the odds. A board that has cupped or bowed but is still solid usually comes back with screws and blocking, or by flipping it over, or by planing the high edges down. What does not come back is a board that has twisted hard, split through its thickness, or cracked at the ends, and a composite board that has buckled from a pinched gap will not straighten either. The bigger question is whether it will stay fixed. If the underside is still sitting over wet, unventilated ground, a flattened board tends to cup again, so the ground and the airflow have to be fixed alongside the board.
- Will warped wood go back to normal?
- Not on its own, and not completely. Wood moves because the moisture in it changed, and while re-wetting or drying a board can relax some of the deformation, the internal grain stress that helped cause it does not reset. In practice a cupped board can be pulled back flat mechanically, with screws and blocking, or planed flat, or flipped. A twisted or split board is done. Treat the shape as permanent and the fix as mechanical, and put your effort into the cause underneath, since a board returned to flat over a wet, sealed-off crawl space will simply go again.
- Should deck boards be cup up or down?
- This is the old "bark side up" argument, and it is worth knowing that it is a traditional heuristic rather than a proven rule. The idea is to read the curve of the growth rings on the cut end and lay the board so it will cup downward rather than upward, since an upward cup holds a puddle while a downward cup sheds it. It is a reasonable tiebreaker when you are laying boards and have no other reason to pick a face. What it is not is protection. A board that is soaking wet on one side and baking on the other will cup the way the moisture tells it to, whichever way you laid it. Ventilation under the deck and sealing all four faces do far more.
- Can you fix warped composite decking?
- Sometimes, but you have to fix the gap, not the board. Composite and PVC buckle because they expand with heat and the expansion gap was too tight, so the board has nowhere to go but up. If you unfasten the board, trim the butt joint back to the gap your manufacturer specifies, and reset it, it will usually lie flat again. The catch is that the right gap is specific to your board and often to the temperature on the day you install. Trex, TimberTech, and AZEK all publish different numbers, and AZEK PVC actually wants its butt joints kept tight with no gap at all. A board that has been kinked hard, or cracked around a wrong fastener, should be replaced rather than reset.